Friday, December 31, 2010

Spinach Sausage Mushroom Frittata

Ah, now THIS is what 2DG's all about!
This Spinach Sausage Mushroom Frittata was made from the leftover Spinach/Sausage/Mushroom mix I had leftover from the Deep Dish Pizza I made two nights ago. I just warmed the leftover mixture in a small skillet, beat 3 eggs with a little bit of milk, salt and pepper and poured that over the warmed filling. Be sure to lift the filling some to allow the beaten egg to get underneath. Let that cook for a few minutes til the eggs are set, then sprinkle on some leftover mozzarella cheese, and put the whole thing under the broiler for a minute or two.

Enjoy with your morning coffee...or drink of choice...

Success be yours in the New Year!

-J

Thursday, December 30, 2010

Deep Dish Pizza

Man o man, where has the time gone?? No posts since the beginning of December and here it is the end of the year! My new year's resolution will be...to be more dedicated to 2nddaygourmet!

So...I was cleaning out the fridge, again, and came up with this little beauty...

I picked up a multi-grain pizza dough at Publix bakery. It's the same dough they use for their multi-grain Italian bread, and it's yummy! Oh another resolution...I will make my own pizza dough in 2011.

I got some plain breakfast sausage, some mozzerella and provolone cheese and used stuff from the fridge for the rest of the fillings. I browned the sausage and doctored it with some of Mike's seasoning mix that he makes, added some fennel seeds and some garlic to the sausage as it browns. Then I added the remenants of an onion, some spring onions and some leftover sliced portabella mushrooms to the skillet. Finally I added, a little at a time, a bag of fresh spinach that was in the fridge and let that cook down.

After the dough had risen for an hour or so, I put it in the 10 inch deep dish pie plate that I had coated with olive oil and sprinkled with cornmeal. Then I added provolone slices and mozerrella on top of the dough. The point is to build a pizza backwards from what you would normally do, so you're adding stuff in the reverse order of what you would typically do for a pizza. Next I put in the sausage/spinach/mushroom/onion combo. You can add these one at a time in layers if you want. I found the last time that cooking the sausage and spinach together worked really well, so I add the rest of the stuff this time too.

Next I added a grated carrot and a half zucchini that I'd cubed, and salted and peppered everything. At this point I'd use a can of crushed tomatoes, but I had a bunch of grape tomatoes and some roma tomatoes (Romas from our GARDEN!) so I chopped them up and put them on and sort of crushed them with my hands when adding them. Then I sprinkled some chopped fresh oregano, marjoram, parsley, thyme and basil on top of the tomatoes, and some more salt and pepper.

Finally I sprinkled some grated parmesan cheese and put it in a 450 degree oven for 20 minutes. I added a little more mozerrella after 20 mins and put it back in for 3 - 5 minutes til it got all nicely melted and gooey.

After sitting for a while, this is what a slice looked like...


Mmmmmmmmmmmmmmmmm!
Enjoy!
-J


Saturday, December 4, 2010

Turkey Mushroom Veggie Risotto

I actually made this earlier in the week, Tuesday, I think, but haven't had time to post this. The base for this was on Simply Recipes, but I added some more stuff to it. Oh, about the rice...I picked up a short grained rice at the grocery store for about 77 cents. I compared this to the special "risotto rice" that I saw that was priced much much higher, and it looked the same to me! It works just fine for risotto. And you need to know, risotto is a very "mindful" dish! You will need to give it almost constant attention, and I use the time to "meditate" a little bit! Hee hee...

I used: Turkey Broth I made from our Thanksgiving turkey, veggie stock I had in the freezer, a chopped onion, and sage I had on hand, leftover sliced portabello mushrooms, a zucchini I had in the fridge that I needed to use, chopped, some leftover creamed spinach that I made for a pot luck dinner on Monday, most of the remaining turkey in the fridge, and some grated parmesan cheese.


I mixed 2 c of Turkey Broth, 1 c. of veggie broth, and 2 c. of water and heated this to a boil. Turn this down and keep it at a simmer. You want the liquid to be hot when you add it to the rice.

Melt 2 Tbsp. butter in a big skillet until it stops foaming a litte. Add onion and about a cup of sliced mushrooms to the butter. Salt them a little and let them sweat until the onions are translucent. Add 3 cloves of garlic, minced, about a Tbsp of fresh sage, and 1 1/2 cups of short grained rice. Stir it a few times and let it cook for about 2 - 3 minutes.

You will now add the stock slowly, a little at a time. I use a ladle that holds a half a cup, so I know how much I'm putting in. First add a cup of the hot stock. Stir it with a wooden spoon until most of the liquid is absorbed. Get used to doing this. You'll be doing it for quite a while!

When most of that liquid has been absorbed, add another half cup of hot stock. Stir again until the rice absorbs most of the stock. The short grained rice will release starch as it cooks, and this will make the dish nice and thick and creamy. Repeat. Repeat. Repeat.

When you get about halfway thru the 5 cups of stock, you can start adding some of the additional veggies you have on hand. At this point, I added the chopped zuchini. Stir stir stir, again until most of the liquid is absorbed. Add another ladle of stock and stir some more. When you've got about a cup of stock left, add the chopped turkey and a half cup of stock. Stir until it's mostly absorbed. I added the last 1/2 c. of stock and stirred that until it was absorbed. Then I added the rest of the creamed spinach, about  a cup, and stirred that in until it was heated thru. This thickens it up a lot!

Toss in a good sprinkle of grated parmesan cheese, and if you want, about a Tblsp. of butter, but that's not really necessary for this risotto, even though I think finishing with butter is a LAW of risotto making! Stir it in and marvel at the creaminess.

Serve and enjoy!
-J

ps...no pix of this one, sorry! And be sure to sample this when you're almost out of stock. You want to check the rice to make sure it's cooked enough. If you run out of stock and feel you need more, heat up some water before adding it a ladle full at a time.

Monday, November 29, 2010

Crab Wings

I'm making my "soon-to-be-famous Crab Wings" for a pot luck dinner tonight. Yesterday I put two big packs of wings in two zip top bags to marinade in some vegetable oil, apple cider vinegar, Old Bay Seasoning, parsley flakes and black pepper.

This morning I made the CrabWing Sauce. Two sticks of butter, two bottles of Frank's Hot Sauce, a dash of apple cider vinegar, and a good healthy dose of Old Bay in a pot on the stove. Put in the Old Bay to taste. I go by color! When the sauce is "almost brown" that's usually enough Old Bay...but sample it often to check. Use crackers, tortilla chips, anything, to sample the sauce.

When it's time to make the wings, I use my Showtime Jr. Rotisserie. (Remember "Just set it...and forget it!"? I tell you, I love this thing! I even made our Thanksgiving turkey in it.) I put the wings in the rotisserie basket and let it spin for about 45 minutes. The really cool thing is...I use the whole wings, tips and all, so when they get brown and are kinda sticking out of the basket...they look a little bit like crab claws. :-)

When they're done, I toss them with the wing sauce and serve with more sauce on the side and some celery sticks and ranch dressing.

Mmmmmmm....Crab Wings....

Enjoy!
-J

Friday, November 19, 2010

Ratatouille and Brunswick Stew

This seems like an odd combination, but I have to do a double post today. Mike and I recently took a trip up to Charleston SC and Savannah GA, so when we got home we needed to clear out the fridge and took some inspiration from the trip...

Ratatouille - not the movie
This is one of my favorite ways to use eggplant and squash. I made some variation of it several times before I learned it really was ratatouille!


Brown some eggplant (sliced or cubed) and place in a casserole dish. Layer on the other veggies...zuchinni, yellow squash, onions, mushrooms and tomatoes. Cover with parmesan cheese and bake at 400 degrees for 40 - 45 mins.

I like it served with some cheesy bread that's been toasted under the broiler. Mmmm!


Brunswick Stew
Mike made Brunswick Stew, named after Brunswick Georgia.
He smoked a chicken out on the patio, and while that was going, made the stew from chicken stock, lima beans, peas, corn. While that was stewing, he made the red sauce from crushed tomatoes, a little hot sauce, onions.
Several hours later, mix them all together and serve!


Sunday, October 17, 2010

All Greek to me

I love Greek food. I especially love pita bread and tziziki sauce. And rotisserie chicken. And roasted veggies...and potatoes...


I found a great recipe for pita bread and tried it for the first time a few months ago. That time, they came out good, but not knowing what I was doing, I over baked them a little bit. Not so this time...they came out perfect!


I made the dough by hand by hand mixing 1 1/2 c. whole wheat flour with 1 1/2 c. unbleached all purpose flour, 1 pkt. rapid rise yeast, 1 T. honey, 1 1/2 tsp salt, 2T olive oil and about 1 1/4 c. lukewarm water. Mixed that by hand until it came together, then kneaded it by hand for 10 minutes. It's possible to do this in a stand mixer, but I did it by hand. After 10 minutes, it was nice and smooth, and I put it in an oiled bowl, covered it with a towel and let it rise for 90 minutes.


After it was nicely risen, I took it out, and cut it in 8 equal portions. Next I rolled these into little balls by sort of cupping my hands over them and rolling them lightly on the board. These got covered with a towel and allowed to rest for 20 minutes. You can see how much they rose in just 20 mintues!


While they were resting I put a cooking sheet upside down on the middle rack of the oven and  heated the oven to 400 degrees. Then the pitas were rolled out to about 1/8 in. thick. When they were all rolled out it was time to bake them. I did them two at a time right on the inverted cookie sheet. About 30 seconds before I put each pair in to bake, I spritzed the oven and the sheet with a few sprays of water. Not exactly sure why, but the recipe said to do it, so I did. I put two of them on the inverted cookie sheet and baked them for 3 minutes.

It amazes me how much they puff up in only 3 minutes! If you want them crispy you can flip them over and let them bake another 2 or 3 minutes. As I said, I did that last time, and they were good, but I like a soft pita so I prefer to take them out after 3 minutes.
These got served with rotisserie chicken, homemade tziziki sauce, roasted fingerling potatoes and veggies, and homemade herb butter.

Mmmmmm.....enjoy!
-J


Sunday, October 10, 2010

Chicken stock

If it's Sunday, and I don't have a million other things to do or places to go, and we happen to be out of stock, I love making stock! We've used up all the chicken stock we had in the freezer, and it's a beautiful fall day in central Florida (highs in the low-mid 80s), and I don't have to be anywhere at all, so there is stock on the stove. It makes my little 2nd day gourmetish heart smile to use this stuff up!


OK,  I admit. We use a LOT of stock. I make chicken, vegetable and beef stock. We use it in gravies, sauces, casseroles, rice, prima vera, even egg drop soup! In fact, we're out of veggie stock too, so I'll be making more of that fairly soon too.

Whenever we have chicken, whether it's fried, wings, rotisserie, whatever, I always throw the bones and the "extra bits" in a freezer bag and put them in the freezer. When we're out of frozen stock or I have 1 or 2 full bags of bits, it's time to make more.

Get your biggest pot and a collander. I put the goods in the collander so that when it's time to remove the bits from the stock, it's really easy. No fishing required! Put the collander in your stock pot. Dump most of your chicken bits in the collander. Grab some leftover raw onion and toss that in on top of the chicken. Get those inner stalks of celery you weren't going to use for anything else. Also get the leafy tops or the big tough bottoms you weren't going to use either. Put them in with the chicken and onion. Got baby carrots or regular carrots taking up space in the produce drawer? In they go. Now put in the rest of the chicken bits. Add some salt and pepper.

Pour enough water over the bits and pieces in the collander to come about halfway up the stock pot. You can pick up the collander to see how much water you've got in there. I tend to over fill the pot and then when it comes to a boil it runs over a bit. If that happens to you, no big deal, just wipe it up as best you can and clean it up later.

Turn the burner to high heat until it comes to a boil, then turn it down and simmer for about an hour. I like to stir things around once in a while, turning things up from the bottom just to make sure everybody gets some time in the spa. Enjoy that lovely smell wafting thru the house!!!

We have some great herbs growing in pots out on the patio, so while the stock is cooking, I'm going shopping in our own herb garden! Whoo! I cut some parsley, some thyme, some sage and some rosemary. After giving them a good wash, I tie them together with some kitchen string, making a "bouquet garni" and set them aside. Don't put them in yet!!

After about an hour, remove the collander and place it to drain in a small bowl or pie pan. After it's drained, you can add the stock in the bowl back to the pot. At this point, I like to turn up the heat and vigorously boil the stock for a while to let it cook down and condense some. Use your judgement as to how much you want it to cook down. The longer you let it go, the stronger and richer the flavor but you may need to use some extra water later when you use the stock in your recipes.

When you're satisfied with how condensed your stock is, turn off the heat. Now drop in your bundle of herbs and let the stock sit for a while. You don't want to put the herbs in while you're cooking the stock at high boil or the poor little guys will be destroyed and the flavor won't have a chance to develop. Just let the whole thing cool. The residual heat will be enough for the herbs.

Once it's cool, take out the bouquet garni and set it aside. Strain your stock into a medium sized bowl. Now put your little herb bundle back in and place a paper towel over the top. Put the bowl in the refrigerator for a few hours or overnight to really let everything blend together and devlop flavor. When you're ready to use or freeze the stock, remove the paper towel, which will help you to remove the chicken fat that has risen to the top of the stock.

Use the stock as you'd like, either now or put it in the freezer for later. I like to freeze my stock in plastic ice trays so that they're easy to use later. Ladle the stock into your ice trays and put them in the freezer overnight. Label a freezer bag with Chicken Stock the date,put in the frozen stock cubes and stash in the freezer for another day. In this pic, I'm using 2 cups of the stock in the brown rice we're having for dinner. The rest is freezer-bound.

Enjoy!
-J

Friday, October 8, 2010

Kiwi Bread

Every other week, we get a produce delivery from a great company, "Orlando Organics". It's great because they deliver right to your door, and they have a number of options for you to choose from. The really great thing, in my opinion, is that they very often include things either I like and don't get a lot, like kiwi, or things I've never even seen before, like persimmons. This week we got about 4 kiwis in our delivery and we still had one in the fridge from last time. Now, I like kiwi as much as the next person, and I've made my share of kiwi smoothies, strawberry kiwi jam and used kiwi in salads, but I needed to find a diferent way to use up these kiwis.


So a web search turned up this recipe for Kiwi Bread. I made just a few changes along the way.

I peeled 5 kiwi fruits, and using my hand blender, pureed them. Recipe called for a cup, and I got about a cup and a half out of them.


In my stand mixer, I combined 1/3 c. vegetable  oil, 1/4 c. honey and 1 egg. Then I added 1 1/2 c. whole wheat flour with which I had sifted 1 tsp. cinnamon, 1 tsp. baking powder, about 1/4 tsp. fresh grated nutmeg instead of cloves called for in the recipe, and 1/4 tsp. salt.

At this point, the batter was looking pretty dry, but that's ok. To that, I added the kiwi puree, 1 c. of chopped pecans (a replacement for the walnuts in the recipe. I hate walnuts too.) Since I had added more kiwi, it was now a little on the wet side, so I added about 3/4 c. of rolled oats to the mix.

All this went into a 9 in. loaf pan sprayed with cooking spray. Again, the recipe called for an 8" pan, but I'd added enough stuff that I thought I should use the bigger pan.  Then I sprinkled some oats on top and put it in a 350 degree oven. Checked it at 45 minutes, but it wasn't quite done yet, so I put it back in for another 10 minutes.


Pulled it out and let it cool for a few minutes. Couldn't resist trying a slice with my last cup of coffee...

Not bad!

Enjoy...
-J


Thursday, October 7, 2010

Proscuitto and Provolone Wrapped Pears and Asparagus

Ever since I made the Provolone and Proscuitto Wrapped Figs and Pears, I've had it in mind to do it again with a few different ingredients. Thanks to the Beef Wellington, I had some proscuitto in the fridge, so why not now? In addition to the leftover proscuitto, I also used leftover asparagus.

Here it's plated with a leftover stuffed chicken breast from Stefanos, my favorite restaurant.


I steamed some of the asparagus in the microwave oven for about 3 minutes.

Take two ripe pears (a pair of pears if you will), halve them and remove the core with a spoon.

Spread a slice of proscuitto and place half a pear on it. Top that with some asparagus. Lightly salt and pepper the stack. Go easy on the salt...the proscuitto is salty already. I used ths really excellent oak smoked pepper I got at the Tea and Spice Shop in Winter Park.


Wrap the proscuitto over the asparagus and pears. Place a slice of  provolone over the proscuitto  wrapped pear and put them in a shallow baking pan.


Put the pan under the broiler for about 3 or 4 minutes until the cheese is melty and brown.


Enjoy!

-J


Sunday, October 3, 2010

Simply Beef Wellington

I am a big fan of the Simply Recipes blog. One of my favorite meals is Beef Wellington, and Elise's recipe for it gave me the inspiration and courage to try it for myself. Instead of one big Wellington using beef tenderloin, I've had great results using top sirloin filets at a fraction of the price to make individual Wellingtons.  I don't know if Gordon Ramsay would like it (Beef Wellington is one of his favorites and he's famous for his version) but we sure do!


Remember Mike's empanadas earlier in the week? Turns out he bought pie crust for it, and there was still one crust in the fridge from it...so...Wellies it is!

1. Chop a pound of mushrooms (this time I just used white mushrooms...last time I used baby portabellas. Use what  you have or what's on sale or what you like.) Then process them in a food processor and put them in a saute pan over medium high heat until most of the water cooks out. They'll cook down to about half their volume. Put them aside to cool.


2. Sear your sirloin filets over medium high heat for about 2 - 3 minutes a side. Let them get a good sear on them until they're nicely browned and carmelized. Put them aside to cool. When cool, spread some dijon mustard on all sides.


3. Spread out some plastic wrap and place a few slices of proscuitto on it, overlapping slightly. Spread the mushrooms on the proscuitto and place one of the filets on the mushrooms. Using the plastic wrap, roll the mushrooms and proscuitto around the filet, getting it as tight as you can. Twist the ends to seal. Place the rolls in the fridge for 20 minutes.


4. Heat the oven to 400 degrees.


5. Roll out the pastry dough or pie dough so it's big enough to wrap around the filets. (If you're making one big Wellington to slice, use the whole crust. If you're making individual Wellies like I am, cut the crust into two pieces.) Place the unwrapped filet roll on the crust. Brush some egg wash (beat an egg with a little bit of water) around the edges, and wrap the dough around the filet roll, sealing the edges. Put the wrapped filets in the fridge, seam side down, for about 10 minutes.

6. Place them on a baking sheet, seam side down, and brush the exposed surfaces with the remaining egg wash. Score the top of the crusts with a sharp knife, but try not to cut all the way thru. If you do, don't worry about it. It will be fine! You're just making a few vents for the steam to escape. Bake in 400 degree oven for 20 minutes for medium rare, longer for more done.The crust will be nice and golden brown from that egg wash. Take them out and let them rest for 10 minutes. Carry over heat will cook them a bit more.


7. Plate and enjoy!


-J

Thursday, September 30, 2010

Jambalaya, Me-0, My-0


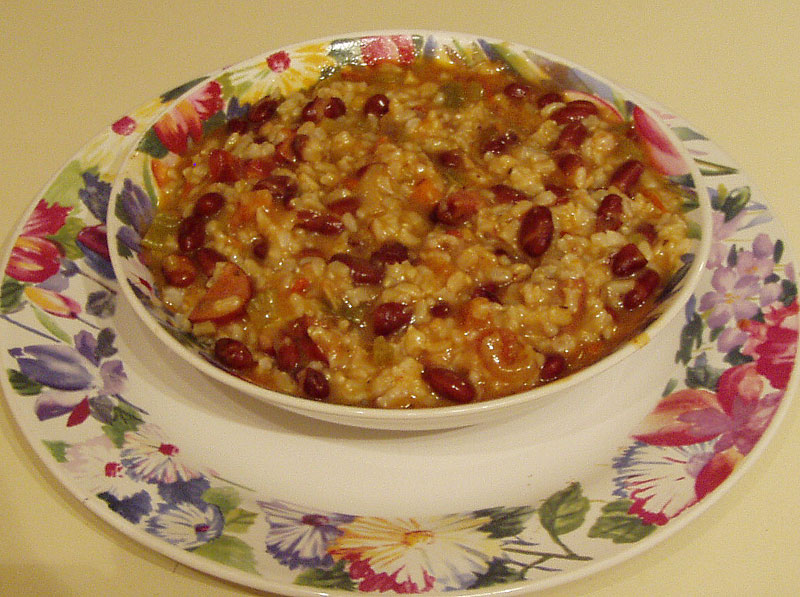
When I got home from work yesterday, Mike was channeling Hank Williams. He'd started out to make Crawfish Pie and Jambalaya, but the bugs were scarce and so he changed his mind and made a Seafood Empanada and some Seafood Stew with just a great roux for a base. So you know I couldn't let that rest. Today's entry is about the Jambalya I'm making from his stew.

My refrigerator inventory included the leftover stew and some remants of a green bell pepper, celery and a tomato. The pantry yielded some onions and some brown rice. So all I really needed to get at the store was a can of red beans and some andouille sausage.

Once I got home with the loot, I chopped most of the remaining green pepper, half an onion, about a stalk and a half of celery and a good sized garlic clove and put them in some olive oil to sweat. A few minutes later, I put in 2 chopped andouille sausages and let them mingle. Then I added a chopped tomato to the mix. When they were all nicely mixed, I put in the remaining stew and stirred them all together. Then I drained the can of red beans and put that in. They're over there getting cozy even as I type this.


I'm also making some brown rice, so I have a lot of time to kill before I can combine everything and dig in.
See?


Monday, September 27, 2010

Homemade Pasta Carbonara

So the cake I made on Friday used 6 egg whites...which meant I had 6 egg yolks just sitting there in the fridge looking for meaning in their lives. Their collective destiny was fulfilled in a marvelous way on Sunday. I used them in the homemade pasta I was making to use in Pasta Carbonara.

It was a collective effort between Mike and me. I made the pasta in the afternoon, very similarly to how I made the Peanut Butter Pasta, but without the peanut butter. I used the rest of the whole wheat flour I had on hand. It rolled out beautifully, and I hung them to dry on the tented cooling racks as before.

Michael browned some pancetta perfectly, and then added some mushrooms and onions to the same pan after removing the pancetta. When they were softened and yummy looking, he added some halved baby carrots and let them blend. I heated up some frozen homemade chicken stock, and added some herbage to the pot. While that was warming, I beat the remaining egg yolks and set them aside.

Mike boiled a big pot of water and added some salt. I tossed in the dry noodles. At the same time, I put some chopped tomatoes in with the veggies in the pan. Five quick minutes later, the pasta was happily floating on the top of the water, so I checked, and it was done. After reserving some of the cooking water, I drained it.

Just because I didn't feel like dragging out my enourmous pasta serving bowl, I put the veggies in the now empty pasta pot over low heat. The noodles went in next and I tossed them to combine. I whisked some of the hot stock into the beaten eggs to temper them, then tossed them in with the noodles. Tossing them about 2 or 3 minutes made sure the noodles were well coated and the eggs were cooked. I added the rest of the stock, a little bit at a time, tossing and turning the pasta with tongs the whole time. They soaked up the sauce and got really well coated. I tossed in the pancetta, and sprinkled on some Parmasan cheese. 

This got placed in some serving bowls and that's it!


Success!

Friday, September 24, 2010

Blood Orange Soda Cake

There was an article and recipe in the Orlando Sentinel a few weeks ago that has just been intriguing me. The article dealt with the new "grown up" sodas that have come on the market recently, and how they could be used in traditional recipes to give them a modern twist. This one for a Blood Orange Cake just grabbed me by the throat and wouldn't let go, so I decided to make it today. This is one of those rare times when there are NO LEFTOVERS involved!

Cake baking, or more accurately, cake decorating is definitely not my forte! But this one did come out kinda pretty, don'tcha think?


I can't wait for Michael to get home so I can cut it...and taste it!
I'll add a pic of what the slice looks like later...

It's later...here's the pic. (It tasted good!)


-J

Tuesday, August 31, 2010

Ever want your own mint?

Everybody dreams of having a mint of their own, don't they? I'm not sure this is what they have in mind...

I have two varieties of mint that are absolutely overtaking our garden. Now, way back, the idea of growing my own mint really sounded good, even fun! These days, I am trying every thing I can think of to use this stuff in and keep it reasonably contained.

We're growing Lime Mint, and Chocolate Mint.

To date, I've done this:

Chocolate mint Lime mint
Hot cocoa

Choc Mint syrup

Chocolate sauce


Tea (hot and iced)

Lime mint syrup

Watermelon sorbet

Over the weekend, I went out armed with kitchen shears to tame the beasts, and ended up pulling about 2/3 of it out with my two gloved hands. I cut off all the roots and leggy stems, and carried about 2 enormous armloads into the kitchen. I filled both sides of the sink with cold water and separated the varieties. Take it from me, they don't mix well together when you taste them. At least, I don't like the result, so I am very careful to use them individually.

I had a good amount of the lime mint, which I soaked in cold water and got any loose dirt off, then santized it in my way cool sanitizer. Then I put ALL OF IT into a gallon pitcher and filled it with boiling water and let it steep for Mint Tea. When it was ready, I put some ice in a tall glass and squirted some of my lime mint syrup into it and poured on the tea. It was very refreshing!

Now for the chocolate mint beast. I had crammed the right side of the sink completely full of chocolate mint. After I took the lime mint out of the left side, I split the chocolate between the two, and still had two full sinks of the stuff.

My goal for the chocolate mint?
Chocolate gelato
Mint cream frosting for brownies

For the gelato, I put about 6 cups of fat free half and half (ha! that always makes me laugh!) into a big pot and put it on to simmer. Then I put as much of the cleaned/sanitized chocolate mint in as I could get in there. Believe it or not, I got about an entire sinkful into that pot! I turned off the heat and let it sit there, with a pie plate and weight on it, so it could steep for about an hour.

Then I removed the mint and strained the half and half. I put it in my big strong blender with about 2 cups of sugar and about 2 tsp of vanilla and let 'er rip. Then I put in about half a bag of mini chocolate chips and blended again. They were instantly melted. I poured all of this into two large sealable plastic containers, added the rest of the mini chocolate chips and shook them like crazy and put them in the freezer. Since I don't have an ice cream machine, I do what I can to mix this and keep it kinda airy. Every so often, I took them out of the freezer and shook them like mad, and turned them upside down for a while. If you do this, please be sure your container's lid will provide a good enough seal! You don't want to try to clean up a sticky frozen mess later. After freezing overnight, I found it to be tasty, even if it's less creamy than ice cream. I usually use homemade gellato to make ice cream sandwiches, so there's a lot of other stuff to focus on rather than a slightly different mouth feel than ice cream. This batch was good.

For the chocolate mint brownies, I have to admit I had a box of brownie mix in the pantry to use up...see? It DOES qualify for 2nd Day Gourmet!

First though I steeped some more chocolate mint in about a cup of heavy cream that I heated to simmer. Just as above, I let it steep for about an hour. During that time, I made the brownies so they could cool a little bit. After removing the mint from the heated cream, I put some powdered sugar and vanilla in there and beat it to thicken. It never got quite to whipped cream stage, so I put in more sugar and made it more like a frosting, but still rather thin. I colored it green with some cake decorating icing coloring, and chilled it a bit to let it thicken up.
Then I spread it on the brownies, and put it in the fridge to set up while we ate dinner. Finally, I took the small squeeze pack of fudge frosting that came with the brownie mix and poured it over the mint cream, hoping to have 2 distinct layers, but there wasn't quite enough of the fudge, so I swirled it. Let me tell you, these things are delicious!

I wonder what I'll do next with this mint...

Tuesday, August 24, 2010

Proscuitto and provolone wrapped pear and figs

I'm always up for a cooking and/or eating adventure. I'd never eaten or used fresh figs before, so when the grocery store had them on their Buy One, Get One special, I couldn't resist. (That's another thing I'm a complete sucker for...the BOGO!)

They had 3 different varieties, none of which were familiar to me, so I picked two interesting looking ones..."Black Mission" and "Brown Turkey" figs. The Missions are a little bit smaller than the Brown Turkeys, just an fyi. I also picked up two Bosc pairs.

I used some of the figs with some mango I had in the fridge that I needed to use up. I made a zabayon sauce and poured it over the sliced figs and diced mango, put some granulated sugar on the top and put them under the broiler to brown for a few mins. This attempt was OK, and was a nice follow up to the Seafood Bisque, but didn't pack the punch I wanted when I ate some of the extra the following day.

Anyhow...on to the topic at hand...

Lay a thin slice of proscuitto on the counter or plate and place about an 1/8 - 1/4 of a pear on it. Place one piece of each type of fig up against the pear. Carefully wrap the proscuitto around the fruit and fasten with toothpick(s) if necessary to hold them together. Gently place a half slice of Provolone cheese over the roll and place it in a shallow baking dish. Repeat this as many times as you like, or until you fill your baking dish.

Place the baking dish under the broiler for 3 - 6 minutes. Keep an eye on them. When the cheese gets melty and a little brown, take them out.  I drizzled a little bit of my lime mint syrup over them, but honey would work great too.

These were a great side to our spaghetti dinner and salad. I also took one to work the next day for lunch.


Enjoy!

Monday, August 23, 2010

Seafood bisque

I finally got around to using up the assorted shellfish shells I'd frozen over the past several months. I had shells from shrimp, crabs, clams and mussels tucked away and intended to make bisque when I had the time. I must say, this did take most of the afternoon, but man was it worth it! And the aroma! I got hungrier and hungrier as the afternoon went on, just smelling the stock! And that was only the first part...

Thanks to Elise at SimplyRecipes, I had a great shellfish stock from which to build the bisque. In fact, this seafood bisque is based on her Crab Bisque recipe with some slight modifications.


I put the shells into a pot and covered them with about another inch of cold water. Gently heat them to just below a boil, then let them not quite simmer for about an hour. I turned it down and let it keep warm until I was ready to continue.

Add some onion, celery, carrot, parsley, thyme and bay leaf, white wine vinegar, about 2 Tbsp. tomato paste and some smoked peppercorns. Let that go for 30 - 45 mins. Let this cool for quite a while. Strain and set aside.

Brown about a third cup of shallots and some garlic and mushrooms in 2 Tbsp butter in the stockpot. When translucent, work in 2T tomato paste and 1/4 cup white rice. Let the rice brown for a minute or two. Add some white wine vinegar and the reserved 4 cups of seafood stock from earlier. Stir. Let this go for about 25 - 30 mins.

Add a can of minced clams with the juice. Stir to combine. Gently put in a pound of fresh mussels. Be sure to check them first to make sure they're all closed up tight. Almost as soon as you put them in, they'll start to open up. Let them simmer for about 5 - 6 minutes, then when they seem to be just about all opened up, remove the soup from the heat and let it cool for a few minutes.

Remove the mussels from the soup. Set them aside.
CAREFULLY add the soup to a blender (do this in batches if necessary) and blend until smooth. You can also use a stick blender for this but be careful with the hot liquid. When smooth, put back in the soup pot. Slowly add about a cup and a half of half and half or cream, whisking as  you pour it in.

Taste and season as needed. I used a tiny bit of Old Bay Seasoning in mine. A touch of nutmeg would be a good alternative.

Remove the meat from about half of the mussels. (Be sure to DISCARD any that do not open up.) Put some of the meat in the serving bowls and ladle bisque over it, or put it in the soup pot with the bisque. Either way, after the bisque is in the bowl, add some of the whole mussels in the shell to each serving. Garnish with croutons.

Just in case we wanted to add it, I put some Old Bay and some hot sauce out on the table when we were ready to eat. I am proud to say that neither of us added a thing to this delicious bisque!

Enjoy!

Wednesday, August 18, 2010

Fried Mac'n'cheesecakes

Michael made some really good mac'n'cheese the other day. There was a little left, so we tried making FRIED Mac'n'cheesecakes with it. They turned out really good!

1. Beat an egg with a small amount of milk in a shallow bowl to make an eggwash. Add a tiny touch of tobasco sauce and some salt and pepper.

2. Put some breadcrumbs in a second shallow bowl. (I used panko, but I'm sure regular will work just fine.) Season the breadcrumbs with salt and pepper or some seasoned salt.

3. Portion the cold mac 'n cheese into small balls, about the size of golf balls. Roll them in the breadcrumbs, then in the eggwash, then in the breadcrumbs a second time.

4. Gently flatten the mac 'n cheese balls slightly with your hand, so they're about the size of a hamburger.

5. Put some vegetable shortening or vegetable oil in a skillet, cast-iron if  you have one, over medium - high heat. While the oil is heating, put a few unpopped kernels of popcorn in the skillet. You'll know the oil is hot enough for your mac 'n cheese cakes when the corn pops!

6. Remove the popped popcorn from the skillet, if it has not already ejected itself like mine did. Carefully place the mac'n'cheesecakes  in the skillet and let them fry for 2 or 3 minutes until they are nice and golden brown. Carefully flip them over and let them go for another few minutes.

7. Remove the mac'n'cheesecakes to a small plate lined with paper towels. If not eating right away, cover with another paper towel. Since you're using really hot oil, they won't absorb a lot of oil, so you won't absorb a lot of oil, but it's still nice to blot up any extra with the towels.

8. We served ours with grilled meatloaf, hashbrowns (two more 2DG creations) and peas. Enjoy!

Thursday, August 5, 2010

My Thai?

This entry isn't about using  up leftovers, really, but I just had to write about it. I mean, all those leftovers have to start from some first creation, don't they? Here's the story of one...

I don't know how I came to be so obsessed with the idea of Peanut Butter Pasta, but I did. I did some web research but didn't see anything from anyone about actually making pasta with peanut butter in the dough. I found lots of recipes for noodles in peanut sauce, which sounds good, but not what I was after. I've had several varieties of flavored pasta from Papardelle's, so I thought if anyone has done it, they would've...but no, they only sold some peanut sauce, no PB pasta. So I became even more intrigued, and I decided I HAD to try it. The way I saw it, there were only two possible outcomes...

1) It would be really good and I'd finally have my own truly unique food creation...

or, more likely...

2) It would be so heinous that it would be completely inedible and I would deny ever even THINKING of it, and would try to erase it from my consciousness.

So last Saturday, I decided to try it. I consulted my Italian cooking book, and came up with a plan of attack. Then I got to work. I'll detail the specifics below, but I don't want to keep you in suspense. Which way do YOU think it went???


Hmm?
Hmm?


Huh?
Want me to tell you?


Ok.


IT WAS FANTASTIC!


Here's how it went.

1. Beat 2 eggs with 2 Tbsp. of homemade peanut butter. Add to mixing bowl.

2. In separate bowl, combine 1 c. of unbleached all purpose flour with 1 c. whole wheat flour.

3. Slowly add the flour to the egg/pb mixture. I didn't add quite all of the flour. Probably had about 10% left in the bowl when the dough looked to have enough.

Right about here, I decided it was too dry and I added one more egg mixed with one more Tbsp. of peanut butter. It still seemed a little dry, but I didn't want to add any more than that.

4. Put dough hook on mixer and mix away.

5. Check dough. Let it mix some more.

6. Check dough again. Fret that it's resembling PB cookie dough. See if patting dough together by hand helps. It does. Draw encouragement from that and try dough hook again.

7. Heave one large, dramatic sigh.

8. Turn off mixer, take dough out of bowl and release on lightly floured counter.

9. Knead dough by hand for a few minutes. Fret more that it resembles cookie dough. Try not to dwell. Add a teeny tiny bit of peanut oil to the dough and resume kneading. All told, I kneaded it for about 8 minutes.

10. Form the dough into a disc, wrap in plastic wrap and let rest on counter for about 45 - 60 mins. Let it go. Try not to worry what will happen next.

11. Unwrap and pat out a bit on lightly floured counter.

12. Grab rolling pin, dust with flour and apply elbow grease. To my great surprise, it rolled out beautifully!


Keep in mind, I usually have problems rolling out pie dough and cookie dough. They tend to stick no matter what I do. This time, though, I was able to roll, turn, flip, rotate, stretch, whatever, and it just kept responding remarkably.

13. Once I got it thin enough, almost see thru, but not quite, it was time to cut the noodles. I had read somewhere about rolling the dough up and cutting into the desired width, but thought that it'd just stick to itself, so instead, I doubled it over on itself. Then, armed only with a ruler (for a straightedge) and a pizza cutter, I went to work. I wanted them to be about the width of fettucini noodles, so I eyeballed the width to be about 3/8 - 1/2" wide and ran the pizza cutter along side the ruler. Then I carefully picked them up in case they got compressed from the ruler. I did get a little bit of breakage from where I was pressing on the ruler, but nothing too bad.

14. Now...drying. How am I gonna dry these beauties? I propped up two cooling racks long-wise, so they looked a little like a pup tent. Then I draped the long noodles over them so they could get lots of air circulation on both sides.


That's it! Now all I had to do was let them dry until I wanted to cook them up and make a Sesame Shrimp Sauce.  (I took inspiration from Pad Thai to create this dish.)

15. After marinading some 16 - 20 count shrimp in Drew's Sesame Orange Marinade for an hour or so, I stir fried them in a mix of a small amount of sesame oil and a bit more peanut oil. When they were pink, I removed them from the skillet and added some sliced scallions and matchstick carrots. Stir fried them for a few mins and then covered them to let them steam a little bit. Then I added some bean sprouts and stir fried them for a few mins. Next it was time for the shrimp to get back in the mix. I added them back to the pan. Next I threw in a few handsful of rough chopped peanuts and about half of an anaheim pepper that I'd chopped. (I removed about half of the seeds.)

16. While all that was going on, I put the dried noodles in some boiling salted water and let them go for about 5 - 6 mins.

17. When all the noodles were floating on the top, I tasted one to see if it was cooked enough. It was, so I drained them in a collander. I added about a Tbsp of peanut oil to the same pot and put the pasta back in there just to give it a touch more peanut flavor.

18. Now I dumped the noodles in a big pasta serving bowl, and put the sauce on top. After tossing with tongs, I added some uncooked peanuts, a little more chopped pepper and grated some lime zest over the whole bowl.

19. To serve, I put some in each pasta bowl, with some bean sprouts to one side, and a wedge of lime.

I can't tell you how shocked and excited I was when I tasted it and it really was good! I was especially happy with the raw peanuts in the dish, and for some reason found that surprising. I can easily see doing this same thing with chicken or almost any type of protein.

20. Next time you think you can't do something just because you don't think anyone else has...forget that! Do it anyway!

-Enjoy!